Build a .NET SaaS App in Minutes with CloudSeed
Essay - Published: 2022.02.10 | 5 min read (1,356 words)
cloudseed | csharp | dotnet
DISCLOSURE: If you buy through affiliate links, I may earn a small commission. (disclosures)
Overview
SaaS apps can take a lot of time to build. A lot of this time is sunk into building scaffolding that isn't directly related to your business. Things like Authentication, Payments, Testing Suites, etc can take weeks to build (and months to get right). This means weeks and months spent working on things that aren't actually your business.
We can skip a lot of this work by using SaaS boilerplate that has a lot of this stuff already built. CloudSeed is a SaaS project template for .NET that comes with these batteries included.
CloudSeed
I built CloudSeed because I was frustrated with the amount of work I had to duplicate each time I wanted to launch a new business. So it has everything you need to start building a business with C# and .NET:
- Users + Authentication
- Payments integration
- Email integration
- Basic UI scaffolding
- Containerized apps
- Local development + testing infrastructure
At the same time I wanted it to be as simple and flexible as possible so that you could use it as a foundation for whatever kind of business you wanted to build - and whatever new technologies you wanted to try.
It stays simple by taking indirect dependencies on stable, trusted technologies:
- Docker for containerization
- Postgres for DB
- Stripe for Payments
- Postmark for Emails
- NextJS for a thin UI layer
It stays flexible by integrating with loose coupling - through physical code separation and strategies like Clean Architecture. For example, it's easy to swap dependencies:
- Swap Postgres for MySQL
- Swap Postmark for Mailgun
- Swap Stripe for ... whatever other payment service is out there
- Swap NextJS for Vue / Angular / etc.
The point being that CloudSeed tries to give you everything you need to get started without getting in the way.
Let's set up your next SaaS app - it shouldn't take 5 minutes.
1. Getting CloudSeed code
First, grab the code from CloudSeed. You can find a link from your Account Page.
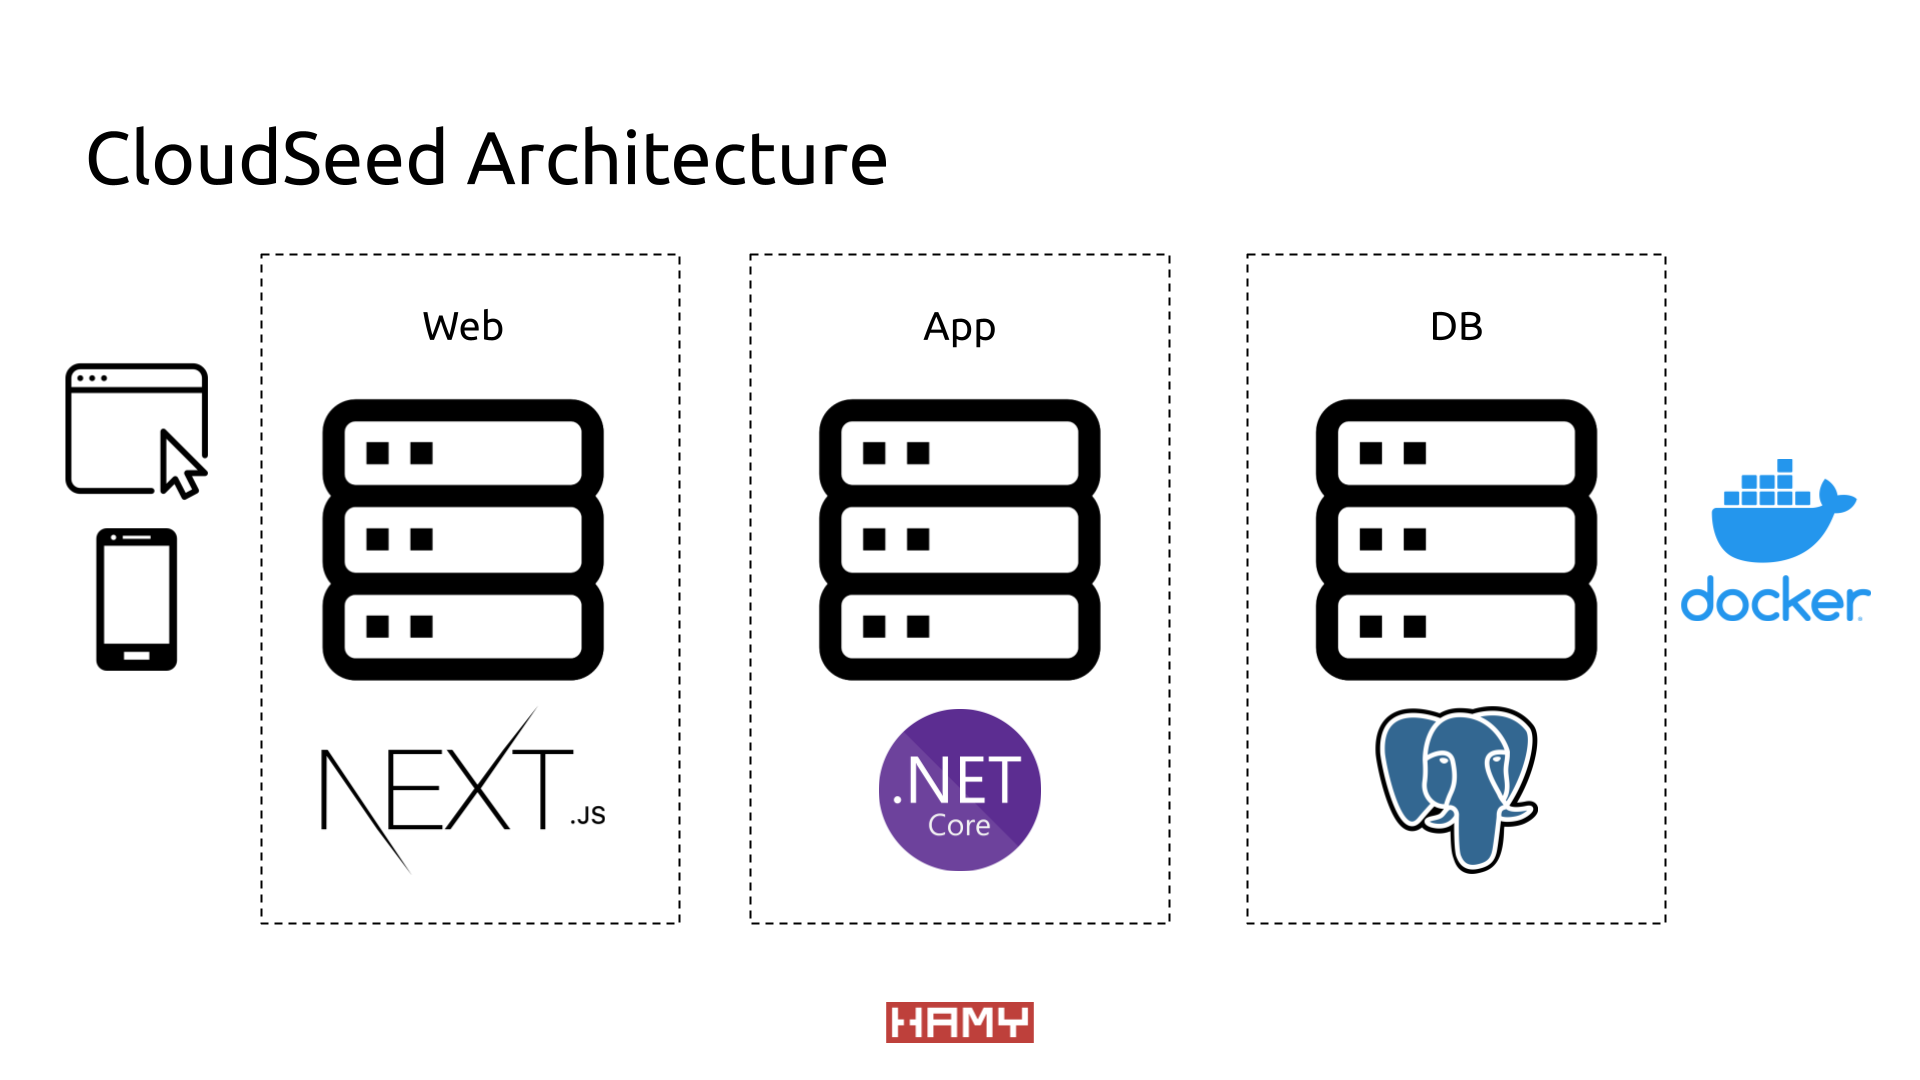
Let's take a brief look at the code. It's split up into 3 major parts:
- App - This is where the core app logic lives, accessible to external services via API (built with .NET)
- Web - This is the frontend - a thin UI layer that interacts with App's APIs (built with NextJS)
- DB - A container used to spin up a live, local db for testing and development (built with Postgres)
Together, this gives us a simple, multi-tier architecture that's ready to scale with both your system and product needs. Plus, it's all containerized with Docker so you can develop and run anywhere.
2. Running CloudSeed
The only dependencies that the code takes to run are:
- Docker - to spin up each component in a container
- Environment Variables - to configure the code to your specifications (locally configured via docker-compose)
If you don't have Docker installed on your machine, go ahead and do that. (Read: Get Docker)
Once Docker is installed, we can get started.
From the root directory of CloudSeed, open a terminal and run:
sudo docker-compose down --remove-orphans && sudo docker-compose build && sudo docker-compose up
This will kick off a Docker process which does a few things:
- Checks if there are existing CloudSeed containers and cleans them up
- Builds new containers from your CloudSeed code
- Runs the containers and connects them to ports on your machine
If the run is successful, you should see outputs from App, Web, and DB in the terminal. (This is a great place to look to see operation logs from your apps as well!)
By default, each container will be available at these ports (though you can configure these to different ports in docker-compose if you wish):
- App -
localhost:5001 - Web -
localhost:5000 - DB -
localhost:5002
Note: On some machines Docker and localhost do not play nice. In this case, you can use host.docker.internal which is Docker's version of localhost.
I've built some health endpoints into App so it's easy to make sure things are working:
localhost:5001/sentinelschecks App -> DB with some basic DB interactionslocalhost:5001/sentinels/authorizedoes the same thing but also enforces a logged-in user to check Authentication
For Web -> App, we'll be going through a bit more of a manual exploration.
3. Exploring CloudSeed
Now let's see what CloudSeed gives us out of the box.
- Head to the Web url -> defaults to
localhost:5000 - We should see a landing page welcoming you to CloudSeed
- Now let's try out Authentication
- Click the Register link to go to the Register page (defaults to
WEBBASEURL/register) - Type in an email you'd like to use and click
Register.- Note: This will be used to send you a login link so make sure it's a real email.
- Now head over to the Login page (defaults to
WEBBASEURL/login) - Put in your email and click
Login- Now you'll see that there was a Postmark error in the UI and in your Terminal. This is because you have not yet set a valid
POSTMARK_API_KEYenvironment variable. You'll need to set this and a few other environment variables before you move to production but while running locally, we output the login url in the terminal. - Note: CloudSeed throws explicit errors when it doesn't find an environment variable it expects. This makes it easy to see which environment variables you need to set.
- Now you'll see that there was a Postmark error in the UI and in your Terminal. This is because you have not yet set a valid
- Go to the terminal and find the
Login Url: xxxxmessage. Copy and pase the URL into your browser. - You should now be logged in. Head to the Account page to try it out (defaults to
WEBBASEURL/account)- This page requires authentication so if you can see it, log in worked!
- Click the Register link to go to the Register page (defaults to
4. Testing CloudSeed
Now any scalable application needs a way to verify it's working correctly. We've built out testing infra to try and mimic real-world scenarios as close as possible. To do this, there's two steps: 1) Run a local DB, 2) Run tests
First we need to run a local DB. To do this, open a terminal at CloudSeed root and run this command:
sudo docker-compose -f docker-compose.test.yml down --remove-orphans && sudo docker-compose -f docker-compose.test.yml up cloudseed_db_test
Similar to our command to run CloudSeed locally (in 2.), this command will:
- Check to see if we have an existing local DB container and spin it down
- Build a new local DB
- Start it up
This runs a local Postgres instance so we can test against real-world scenarios.
Next, we need to actually run tests against it. The tests we'll be running all hit App as that's where the core of our logic is. To run these App.Tests, open a new terminal from root and run:
sudo docker-compose -f docker-compose.test.yml build cloudseed_app_tests && sudo docker-compose -f docker-compose.test.yml up cloudseed_app_tests
This will:
- Check for existing App.Tests containers and spin them down
- Build App and App.Tests code into a container
- Run the tests
Upon running, you'll see output of the test run in your terminal.
These tests hold everything from Unit Tests to full Integration Tests. There are many examples included so you can use them as a template for writing your own.
5. Building your Business
With that introduction, you have everything you need to get started testing and developing your own app on the foundations provided by CloudSeed. All of the instructions provided here are also available in CloudSeed's documentation and we're working on making more of this documentation public on the CloudSeed website.
I hope you enjoy CloudSeed as much as I enjoy building and using it. If you have any questions or run into any issues, feel free to reach out to me on Twitter or create an Issue in the GitHub repo - I'll get back to you as soon as I can.
Happy Coding!
-HAMY.OUT
Want more like this?
The best way to support my work is to like / comment / share this post on your favorite socials.